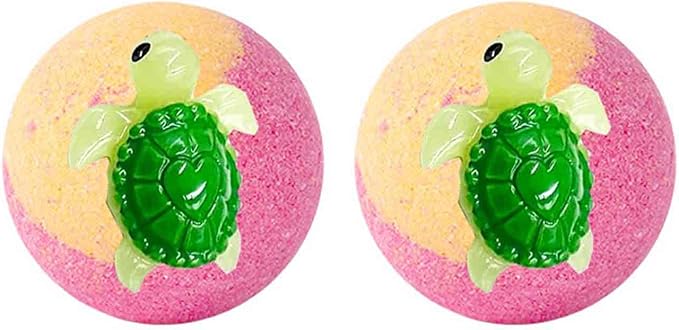

Imagine dropping a single sphere into your bathwater and watching it erupt into swirling ribbons of red, orange, yellow, green, blue, and violet. Rainbow bath bombs turn an ordinary soak into something genuinely magical, and the best part is you can make them at home without any special skills.
In this step-by-step bath bomb recipe, you'll learn exactly how to create multi-colored, fizzy bath bombs using accessible ingredients from your kitchen and local craft store. Whether you've never made a DIY bath bomb before or you've tried and ended up with a crumbly mess, this tutorial will walk you through the process from start to finish.
What Makes a Rainbow Bath Bomb Different from a Regular Bath Fizzy
A standard bath bomb uses one color throughout. A rainbow bath bomb relies on a layered color technique, where multiple individually tinted portions of the same base mixture are packed into a single mold in distinct layers.
When the bomb hits water, each layer dissolves at a slightly different rate, releasing its own pigment. The result is that gorgeous rainbow swirl effect rather than a single uniform color. Think of it like a jawbreaker candy — same core recipe, but each ring brings something new to the show.
Ingredients You'll Need
Dry Ingredients
Baking soda — 1 cup (the alkaline base that reacts with acid to create fizz)
Citric acid — ½ cup (the fizz agent that makes the bubbling reaction happen)
Cornstarch — ½ cup (acts as a binder and softens skin)
Epsom salt — ½ cup, optional (adds muscle-relaxing magnesium to your bath)
Wet Ingredients
Coconut oil or sweet almond oil — 2.5 tablespoons (moisturizing carrier that holds everything together)
Essential oils for bath bombs — 15-20 drops total (lavender for relaxation, eucalyptus for invigoration, or citrus blends for an uplifting mood)
Witch hazel — in a spray bottle (binding spray you'll add gradually)
Coloring Agents
For natural bath bomb colors, mica powders are the gold standard. They're skin-safe, vibrant, and widely available in craft stores. You can also experiment with beetroot powder for reds and pinks, spirulina for greens, and turmeric for warm yellows.
Skin-safe synthetic colorants (often labeled as "bath bomb dyes" or "lake dyes") are another solid option if you want ultra-bright shades. Avoid standard liquid food coloring — it tends to stain skin and tubs.
For a full rainbow effect, you'll need a minimum of four to six shades: red, orange, yellow, green, blue, and violet. You can simplify to four colors (red, yellow, green, purple) if you prefer a less complex process.
Tools and Molds
Mixing bowls — one per color (small cereal bowls work perfectly)
Bath bomb molds — round sphere molds in standard 2.5-inch size
Spray bottle filled with witch hazel
Whisk or fork
Measuring spoons and cups
Disposable gloves (mica powder stains fingers)
Step-by-Step Instructions for Your Rainbow Bath Bomb
Step 1: Mix the Dry Base
Combine your baking soda, citric acid, cornstarch, and Epsom salt in a large bowl using a 2:1:1:1 ratio. Whisk everything together thoroughly for at least 60 seconds, breaking up any clumps with your fingers or pressing them against the side of the bowl.
A smooth, uniform dry mix matters more than you might think. Lumps of concentrated citric acid create uneven fizzing, and clumps of baking soda leave chalky spots in your finished colorful bath fizzy. Take the extra minute to get it right.
Step 2: Add Wet Ingredients
Melt your coconut oil gently (10-15 seconds in the microwave or in a warm water bath). Stir in your chosen essential oils.
Now here's the critical part: drizzle the oil mixture into your dry ingredients very slowly while stirring constantly with your other hand. If you pour too fast, you'll trigger the citric acid reaction prematurely and hear that telltale fizzing sound. Go slow, stir fast.
Once the oil is incorporated, spritz witch hazel from your spray bottle — two to three spritzes at a time — while mixing. Keep going until the mixture holds its shape when you squeeze a handful. It should feel like damp sand at the beach, holding together without crumbling but not wet or sticky.
Step 3: Divide and Color Your Mixture
Split your base mixture into equal portions — one for each color of your rainbow. If you're doing six colors, divide into six small bowls. Four colors means four bowls.
Add mica powder or your chosen natural bath bomb color to each bowl. Start with about ¼ teaspoon per portion and mix thoroughly. For vibrant, saturated shades, add up to ½ teaspoon. For softer pastel tones, stick with ⅛ teaspoon.
Mix until the color is completely uniform with no white streaks remaining. Wearing gloves here saves you from having rainbow-stained hands for the next two days.
Step 4: Layer the Colors in Your Mold
This is where the magic happens. Take one half of your sphere mold and begin pressing in your first color — just a thin layer, about ¼ inch thick, packed firmly against the bottom and sides of the mold. Press hard with your thumbs. Loose packing is the number one reason bath bombs fall apart.
Add your next color on top, pressing firmly again. Continue layering in rainbow order (red, orange, yellow, green, blue, violet) until the mold half is slightly overfilled — the mixture should dome above the rim.
Repeat with the other mold half, working from violet back to red (or however you prefer). Then press both halves together firmly without twisting. The overfilled mixture creates the pressure needed to bond the two halves into one solid sphere.
Hold the mold together for about 10 seconds, applying steady pressure. Then gently tap one side of the mold and carefully lift it away. Remove the second half slowly.
Step 5: Unmold and Cure
After removing from the mold, place your rainbow bath bomb on a sheet of parchment paper or a drying rack. Handle it gently — it's still fragile at this stage.
Let your bath bombs dry and harden for 24 to 48 hours in a cool, dry place away from any moisture. Avoid bathrooms during this curing period since humidity is the enemy.
Curing time matters because it allows residual moisture to evaporate, giving you a harder, more durable bomb that fizzes longer and more dramatically when it finally hits water. Skip this step and you'll get a soft bomb that dissolves too quickly or crumbles in your hands.
Pro Tips for a Perfect Colorful Bath Fizzy
Avoid These Common Mistakes
Adding too much liquid — If your mixture starts fizzing in the bowl, you've gone too far. Work in tiny increments.
Under-packing the mold — Press harder than you think necessary. Each layer should feel solid under your thumb.
Using liquid food coloring — It adds too much moisture and often stains skin and tubs. Stick with mica powders or bath-safe dyes.
Skipping the curing period — Patience pays off. A fully cured bomb fizzes better and holds together during storage and handling.
How to Get Brighter, Longer-Lasting Colors
If your colors look muted in the water, increase your mica powder concentration slightly in the next batch. A little goes a long way, but don't be afraid to experiment.
Add a small amount of polysorbate 80 (about ½ teaspoon per batch) to your wet ingredients. This emulsifier helps disperse mica evenly through bathwater instead of letting it float on the surface or cling to the tub walls. It's the secret ingredient that prevents tub staining while making colors appear more vivid in the water.
For the most dramatic rainbow effect, make your layers thinner and more distinct. The more defined each color band is, the more visually striking the dissolving pattern becomes.
Customization Ideas
Scent Combinations That Complement Rainbow Themes
Rainbow bath bombs feel playful and joyful, so match that energy with your essential oil choices. A tropical blend of sweet orange, ylang-ylang, and a touch of vanilla works beautifully. For something fruity, try grapefruit and bergamot. A floral option like lavender and geranium keeps things calming while still feeling special.
You can also assign different scents to different color layers for a multi-sensory experience, though this works best with complementary fragrances rather than competing ones.
Add-Ins for Extra Flair
Biodegradable glitter adds sparkle without harming waterways. Dried flower petals (lavender buds, rose petals, calendula) pressed into the outer layer create a beautiful visual on the surface of your bath.
For a fun surprise, embed a small contrasting-color bath bomb nugget in the center. As the outer layers dissolve, a burst of unexpected color emerges. Just make sure any add-ins you use are tub-safe and won't clog your drain.
Storage and Shelf Life
Store your finished rainbow bath bombs in an airtight container, away from moisture and direct sunlight. A sealed plastic bin with a tight lid works perfectly. You can also wrap each bomb individually in plastic wrap for extra protection.
Properly stored DIY bath bombs last three to six months. The fizz gradually weakens over time as the citric acid slowly reacts with ambient moisture, so fresher is always better. For gifting, wrap in tissue paper inside a clear cellophane bag tied with ribbon — simple, attractive, and protective.
Frequently Asked Questions
Will rainbow bath bombs stain my bathtub?
Mica powders are generally non-staining and rinse away easily with water. The risk of staining increases if you use synthetic dyes without a dispersant. Adding polysorbate 80 to your recipe helps colors disperse evenly through the water rather than settling on tub surfaces. If you do notice any residual color, a quick wipe with a damp cloth or a spritz of bathroom cleaner immediately after draining removes it completely.
Can I make rainbow bath bombs without citric acid?
You can substitute cream of tartar for citric acid, but expect a gentler, less dramatic fizz. Cream of tartar is a weaker acid, so the reaction is slower and produces fewer bubbles. Use a 1:1 swap ratio. The bath bomb will still work and release colors, but it won't have that satisfying explosive fizz that citric acid provides. For the full experience, citric acid is worth sourcing — it's readily available online and in bulk food stores.
Are DIY bath bombs safe for kids?
Yes, with a few precautions. Use skin-safe colorants like cosmetic-grade mica powders and skip essential oils for children under three (or use a single drop of gentle lavender for older kids). Avoid any ingredients the child may be allergic to. Always supervise young children during bath time, and test a small piece of the bath bomb in water first if your child has sensitive skin.
How many bath bombs does one batch make?
Using the quantities listed in this recipe (1 cup baking soda, ½ cup citric acid, ½ cup cornstarch, ½ cup Epsom salt), you'll get approximately four to six medium-sized bath bombs using standard 2.5-inch sphere molds. The exact yield depends on how tightly you pack your molds and how thick you make each layer.
Why did my bath bomb crumble or crack?
The most common cause is insufficient moisture — your mixture wasn't damp enough to bind properly. It should hold together firmly when squeezed. The second culprit is not packing tightly enough into the mold. Press each layer with real pressure. Finally, high humidity during curing can cause surface cracking as the outer layer reacts with moisture in the air. Cure your bombs in the driest room available, and consider running a dehumidifier nearby if you live in a humid climate.
Final Thoughts
Making a rainbow bath bomb at home is one of those projects that looks impressive but is genuinely simple once you nail the technique. Don't stress about perfection on your first try — experiment with different color combinations, scent blends, and layering patterns until you find what you love. Your bathtub is about to become a lot more colorful.