
There's something deeply satisfying about dropping a fizzy, colorful sphere into warm bathwater and watching it dissolve into a swirl of fragrance and bubbles. The good news? You don't need to spend $8–$15 per bath bomb at a boutique shop. Making your own at home is surprisingly easy, wildly affordable, and genuinely fun.
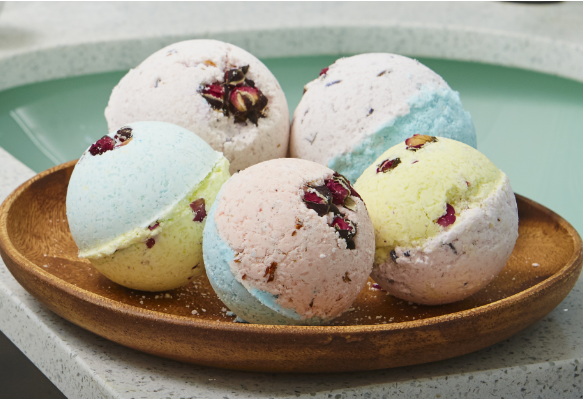
This guide walks you through everything from gathering ingredients to unmolding your finished creations. Whether you're a complete beginner or looking to level up your craft, you'll find clear steps, helpful tables, and troubleshooting tips to get perfect results every time.
What Are Bath Bombs and Why Make Your Own?
Bath bombs are compact, dry mixtures that fizz and dissolve when they hit water. They release fragrance, color, moisturizing oils, and sometimes fun extras like flower petals or glitter into your bath. Think of them as a spa upgrade you can toss into any ordinary tub.
The fizz comes from a straightforward chemical reaction. When citric acid and baking soda meet water, they produce carbon dioxide gas — those satisfying bubbles you see dancing across the surface. It's the same reaction that makes a baking soda volcano work, just gentler and far more luxurious.
Why Homemade Beats Store-Bought
Cost savings: A single batch of homemade bath bombs costs roughly the same as one or two store-bought ones, but yields 6–8 bombs.
Ingredient control: You decide exactly what touches your skin — no mystery chemicals, no synthetic fragrances you can't pronounce.
Total customization: Pick your own colors, scents, shapes, and add-ins to match your mood or aesthetic.
Gift potential: Handmade bath bombs make thoughtful, impressive gifts that look like they came from an artisan shop.
Once you learn this basic bath bomb recipe homemade, you'll wonder why you ever paid retail prices for something so simple to create yourself.
Ingredients You Need for Homemade Bath Bombs
One of the best things about this project is how accessible the ingredients are. You can find most of them at your local grocery store, and the rest are a quick online order away. Let's break down what you need.
Essential Base Ingredients
| Ingredient | Purpose | Approximate Cost |
|---|---|---|
| Baking soda (sodium bicarbonate) | Base/alkaline agent, softens skin | $3–5 per box |
| Citric acid | Creates the fizzing reaction with baking soda | $8–12 per bag |
| Cornstarch | Binds mixture together, adds silky texture | $3–4 per box |
| Epsom salt | Muscle relaxation, adds pleasing texture | $5–8 per bag |
| Coconut oil (or sweet almond oil) | Moisturizer and binding agent | $7–10 per jar |
| Witch hazel (or water) | Activates binding without premature fizz | $4–6 per bottle |
A quick note on witch hazel: it's strongly preferred over plain water because it evaporates more slowly and is less likely to trigger the citric acid and baking soda reaction before you're ready. You'll find it in the skincare aisle of most pharmacies.
Optional Add-Ins for Customization
This is where things get creative. Once you've nailed the base recipe, you can personalize each batch with these extras:
Essential oils for bath bombs: Lavender for relaxation, eucalyptus for congestion relief, peppermint for an invigorating soak, or citrus blends for a mood boost.
Natural colorants: Mica powder (available in dozens of shades), beetroot powder for pink, spirulina for green, or turmeric for golden yellow.
Dried botanicals: Rose petals, calendula flowers, lavender buds, or chamomile for visual appeal.
Skin-safe glitter: Biodegradable shimmer adds sparkle without harming waterways.
Carrier oils: Jojoba or sweet almond oil for extra skin-softening benefits.
Choosing Natural Bath Bomb Ingredients (Skin Safety Tips)
Your skin is your largest organ, and it's soaking in whatever you dissolve into that bathwater. Choosing natural bath bomb ingredients isn't just trendy — it's genuinely better for most people's skin.
Avoid synthetic fragrance oils labeled simply as "fragrance" without further detail. These can contain dozens of undisclosed chemicals that may irritate sensitive skin. Instead, opt for pure essential oils from reputable brands that list the botanical source clearly.
If you're making bath bombs for children, skip essential oils entirely or use them at half-strength. Stick with gentle colorants and always do a patch test with any new ingredient — dab a small amount on the inner wrist and wait 24 hours to check for reactions.
Equipment and Mold Options
Basic Tools Needed
You don't need any fancy equipment. Here's your essential toolkit:
Large mixing bowl (glass or stainless steel — avoid plastic, which can stain with colorants)
Whisk or your gloved hands for mixing
Measuring cups and spoons
Small spray bottle filled with witch hazel
Bath bomb molds in your preferred shapes
Parchment paper or a drying rack
Choosing the Right Mold Shapes
The mold shapes you pick affect both the look and the fizzy performance of your bath bombs. Here's a comparison to help you choose:
| Mold Type | Best For | Difficulty Level |
|---|---|---|
| Metal sphere (2-piece) | Classic round bath bombs | Beginner |
| Silicone molds | Fun shapes, easy release | Beginner |
| Plastic ornament shells | Large statement bombs | Intermediate |
| Cupcake/muffin tins | Flat-top bombs, batch production | Beginner |
| 3D printed custom molds | Unique gifts, branding | Advanced |
For beginners, metal sphere molds (around $5–$10 for a set) give you that classic bath bomb shape with reliable results. Silicone molds are the easiest to release — just flex the mold and your bomb pops right out. You can find affordable mold shapes in craft stores, online marketplaces, or even repurpose items like ice cube trays and muffin tins.
Pro tip: lightly coat any non-silicone mold with coconut oil before packing to prevent sticking.
Step-by-Step Bath Bomb Recipe and Instructions
Here it is — your complete, beginner-friendly recipe. This makes approximately 6–8 medium bath bombs depending on your mold size.
Step 1 — Mix the Dry Ingredients
In your large mixing bowl, combine:
1 cup baking soda
½ cup citric acid
½ cup cornstarch
½ cup Epsom salt
Whisk everything thoroughly for at least 30 seconds. You want a completely uniform, lump-free mixture. Break up any clumps with your fingers or press them against the side of the bowl. This step matters more than you'd think — clumps create weak spots in your finished bath bombs.
Step 2 — Combine the Wet Ingredients
In a separate small bowl or measuring cup, mix together:
2½ tablespoons melted coconut oil (warm but not hot)
¾ tablespoon witch hazel
15–20 drops of your chosen essential oil
A few drops of colorant (if using liquid; mix mica powder into dry ingredients instead)
Stir until the wet ingredients are fully combined. If you're using coconut oil, make sure it's liquid but cooled slightly — too much heat can activate the fizz prematurely.
Step 3 — Slowly Combine Wet into Dry
This is the most critical step, so take it slow. Pour the wet mixture into the dry ingredients in a thin stream while whisking constantly with your other hand. If you dump it all in at once, you risk triggering the citric acid and baking soda reaction early — you'll see fizzing and bubbling, which means you're losing your precious fizz power.
Keep mixing until everything is evenly distributed. The texture you're aiming for is "wet sand" — when you grab a handful and squeeze, it should hold together in a clump without crumbling apart. If it's too dry, give it 2–3 spritzes of witch hazel from your spray bottle and mix again.
Step 4 — Pack the Molds Tightly
Speed matters here. Once your mixture is ready, pack it into molds promptly before it begins to dry out.
For sphere molds: Overfill each half slightly, mounding the mixture above the rim. Press both halves together firmly without twisting. Hold for a few seconds, then gently remove one side of the mold, leaving the bomb in the other half to set.
For silicone molds: Press the mixture in firmly with your thumbs or the back of a spoon. Really pack it down — the tighter you compress, the harder and more durable your final bath bomb will be.
Step 5 — Drying and Unmolding
Patience is your friend here. Let your bath bombs dry for 24–48 hours in a cool, dry location. Avoid bathrooms (too humid) and sunny windowsills (can fade colors).
After drying, carefully unmold your creations. For metal molds, gently tap the outside and lift away. For silicone, flex the mold edges and push from the bottom. If they resist, give them another 12 hours.
Store finished bath bombs in an airtight container, wrapped individually in plastic wrap, or sealed in cellophane bags. Keep them away from moisture — even ambient bathroom humidity will slowly activate the fizz over time.
Troubleshooting Common Bath Bomb Problems
Don't worry if your first batch isn't perfect. Even experienced bath bomb makers run into issues. Here's a quick-reference guide for the most common problems:
| Problem | Likely Cause | Fix |
|---|---|---|
| Crumbling apart | Too dry or not packed tightly enough | Add 2–3 more spritzes of witch hazel; press harder into molds |
| Expanding or cracking | Too much moisture or high humidity | Reduce liquid slightly; dry in a low-humidity room |
| Won't fizz in water | Old citric acid or incorrect ratio | Use fresh citric acid; maintain 2:1 baking soda to citric acid ratio |
| Sticking to mold | No release agent used | Lightly oil mold before packing, or switch to silicone |
| Flat or misshapen | Unmolded too early | Wait the full 24–48 hours before removing from molds |
| Fizzing during mixing | Added liquid too quickly | Pour wet into dry more slowly; use witch hazel spray instead of pouring |
The most common mistake beginners make is not packing firmly enough. Don't be gentle — really press that mixture in. You want it dense and solid.
Creative Variations and Gift Ideas
Themed Bath Bomb Recipes
Once you've mastered the basic recipe, try these crowd-favorite variations:
Relaxation blend: Lavender essential oil + dried chamomile + purple mica powder. Perfect for unwinding before bed.
Energizing citrus: Sweet orange + lemon essential oils + yellow colorant + a pinch of poppy seeds for texture.
Eucalyptus cold relief: Eucalyptus oil + a tiny amount of menthol crystals + blue-green mica. Wonderful when you're stuffed up.
Kid-friendly surprise: No essential oils, bright fun colors, and a small waterproof toy hidden in the center. Kids go wild for these.
Romantic rose: Rose geranium oil + dried rose petals + pink mica + a touch of gold shimmer.
Packaging for Gifts
Handmade bath bombs make incredible gifts, and presentation takes them from "craft project" to "boutique quality" in minutes.
Shrink wrap: Gives a professional, sealed look. Use a hair dryer to shrink the wrap snugly around each bomb.
Tissue paper and twine: Wrap individual bombs in colored tissue paper tied with natural twine for a rustic aesthetic.
Mason jars: Place smaller bath bombs in a clear jar with a ribbon and handwritten label.
Gift boxes: Arrange 4–6 bombs in a shallow box lined with shredded paper for a curated set.
Always include an ingredient label, especially when gifting. Recipients with allergies or sensitivities will appreciate knowing exactly what's in their bath bomb. A simple tag listing the main ingredients is enough.
Batch-making for holidays, weddings, or baby showers is where this hobby really shines. You can produce dozens of bath bombs in an afternoon for a fraction of what you'd pay for store-bought favors.
Storage, Shelf Life, and Safety Notes
How Long Do Homemade Bath Bombs Last?
When stored properly, homemade bath bombs maintain their quality for 3–6 months. After that, they won't harm you, but you'll notice the fizz becoming weaker and the scent fading.
Signs your bath bomb is past its prime:
Little to no fizz when dropped in water
Scent has faded significantly
Color looks dull or patchy
Texture feels soft or powdery (it's absorbing moisture)
For maximum shelf life, wrap each bath bomb individually in plastic wrap or store them in airtight containers with silica gel packets. Keep them in a cool, dry closet — never in the bathroom where shower steam will slowly degrade them.
Safety Considerations
Bath bombs are generally very safe, but a few common-sense precautions are worth noting:
Keep away from eyes. The citric acid can sting. If contact occurs, rinse thoroughly with clean water.
Supervise children. Young kids might be tempted to taste the colorful fizzy ball. Essential oils can also be too strong for small children — use unscented versions for kids under 3.
Pet safety. Many essential oils (especially tea tree, eucalyptus, and peppermint) are toxic to cats and dogs. Never use bath bombs with essential oils when bathing animals.
Protect your drain. Dried flowers and large botanicals can clog pipes. Place them in a mesh bag or cheesecloth pouch before adding to the bath bomb, or simply enjoy them on the surface and scoop them out before draining.
Slippery tub warning. The oils in bath bombs can make your tub slippery. Rinse the tub after draining and use a bath mat when stepping out.
Frequently Asked Questions About DIY Bath Bombs
Can I make bath bombs without citric acid?
Yes, though the fizz won't be as dramatic. You can substitute cream of tartar (use the same amount as you would citric acid) for a gentler reaction. Some recipes use powdered vitamin C (ascorbic acid) as an alternative. The fizz will be softer and shorter-lived, but you'll still get a pleasant effervescence.
Are homemade bath bombs safe for kids?
Absolutely, with a few adjustments. Skip essential oils for children under 3, use only food-grade colorants, and avoid glitter that could irritate eyes. The base ingredients — baking soda, citric acid, cornstarch, and Epsom salt — are all gentle and non-toxic.
Why do my bath bombs keep cracking?
Cracking usually means excess moisture is trapped inside, expanding as it tries to escape. This happens in humid environments or when too much liquid is added. Try reducing your witch hazel by half a teaspoon, and dry your bath bombs in the lowest-humidity room available. Running a dehumidifier nearby can help significantly.
How many bath bombs does one batch make?
The recipe in this guide produces approximately 6–8 medium-sized bath bombs (about tennis ball size) or 10–12 smaller ones. You can easily double or triple the recipe for larger batches — just maintain the same ratios.
Can I sell homemade bath bombs?
You can, but there are regulations to follow. In the United States, bath bombs are considered cosmetics and fall under FDA guidelines. You'll need proper labeling (ingredients listed in descending order), safe manufacturing practices, and potentially liability insurance. Research your local regulations before selling at markets or online.
What's the ideal baking soda to citric acid ratio?
The standard ratio is 2:1 — two parts baking soda to one part citric acid. This gives you a strong, long-lasting fizz without making the bath water too acidic. Some makers go as far as 3:1 for a gentler, slower fizz, but 2:1 is the sweet spot for most people.
Making your own bath bombs is one of those rare crafts that's genuinely easy, impressively affordable, and produces results that look and feel professional from your very first batch. Start with the basic recipe, get comfortable with the process, and then let your creativity run wild with colors, scents, and shapes. Your bathtub — and your wallet — will thank you.